Monday, July 30, 2007

Strawberry Mirror Cake: Daring Bakers July

Strawberry Mirror Cake
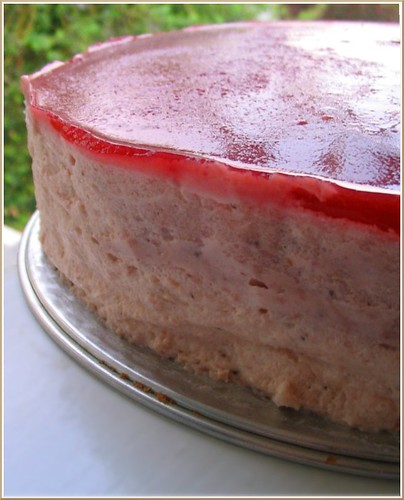
This month Peabody of Culinary Concoctions chose a beautiful Strawberry Mirror Cake for the July Daring Baker Challenge. The cake consists of 3 parts: sponge cake, strawberry Bavarian cream, and a strawberry gelatin (none of which I have made before). The whole process took Bettina and I about 2 days to complete. Out of all the days in this month, we just happened to pick the hottest day of this year (remember me complaining about that heat wave?) to do the challenge, which was not a good idea.

The Cake:
I was a little worried the cake would taste too eggy since the recipe called for 6 eggs. Three of the eggs were separated and the whites were beaten to stiff peaks and the 3 yolks were combined with the 3 remaining eggs and beaten "until thick and light." I've never made a sponge cake before so I thought I could beat the eggs by hand, while I leave my KitchenAid to beat the whites. I was feeling particularly lethargic in the heat that day so I didn't want to wash out my mixing bowl after beating the eggs to beat the whites. This is rather ironic because washing the bowl would have taken one minute whereas we spent 10 times longer beating them by hand. I had no trouble beating the whites but beating the eggs by hand was not a good idea when it was 90 degrees indoors. Bettina and I had to take turns beating the eggs. After 10 seconds of beating we would break into a sweat and have to go sit in front of the fan to cool off while the other person took over the beating. They looked a tad thicker but little did I know, they were suppose to double, triple, even quadruple their original volume! The color was supposed to be very pale yellow but mine were still very yellow. Some DBs beat the eggs for 20 minutes in a KA, imagine how long I would have had to beat by hand to achieve the same result! Eek! In the end we were fed up with the eggs and proceeded to the next step. The eggs were still very liquidy rather than light and voluminous, so folding in the cake flour and the whites was very troublesome.

When the cakes emerged from the oven (450 degree oven on a hot summer day, not fun), the tops were an even golden brown and looked very nice. They were springy to the touch. However, they had shrunk to about 7 1/2 inches in diameter, when I baked them in an 8in cake pan. When I flipped the cake out to cool, I noticed the bottom felt tough and rubbery. I crossed my fingers and hoped it was just a thin layer on the bottom of the cake that would be remedied by pouring the cream on top.

The Cream and Mirror:
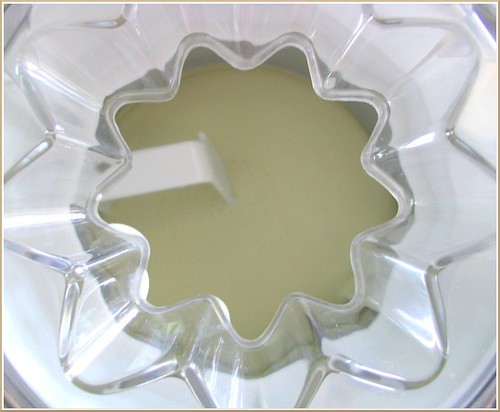
No major problems with the Bavarian cream or mirror. There was a little foam and bubbles on top of the mirror that I neglected to skim off so the mirror wasn't as shiny or smooth as it could have been. (I was getting a little lazy towards the end.)

The Assembly:
Now here is where it got tricky. In the original recipe, the cake is baked in a 11 by 17 jelly roll pan and then 8 1/4 in diameter cake rounds are cut out of the rectangular sheet cake. A round is placed in a 10 in springform then the Bavarian cream is poured over it when it is thick but still somewhat liquidy. I had a 10 in springform pan however, since my cake layers had shrunk to 7 1/2 inches, that would mean the outer layer of frosting would be over an inch thick, way too thick. I didn't have a 9 in springform but using my Daring Baker ingenuity (dun da da dun!), I fashioned a foil collar that I set around the cake so I could pour in the Bavarian without the outer layer being overly thick of cream. I had to tuck the bottom of the foil under the cake so the cream wouldn't leak. I really wish I had remembered to take a picture of this setup because it was quite a hilarious and ridiculous sight. Bettina and I cracked up every time we looked this "disposable springform".

The Final Verdict:
The Bavarian was fluffy and airy when I made it but setting overnight in the fridge it ended up being a little too rubbery for my tastes. I've never made or had Bavarian cream before so I wasn't sure if Bavarian cream was supposed to have that texture. However, I really loved the flavor of the cream. It was light, full of the lovely flavor and fragrance of fresh strawberries. The strawberries impart a beautiful and delicate pink hue to the cream. When I sliced into the cake, I saw that the bottom 1/3 of the cake was a rubbery inedible mess (due to not beating the eggs enough). The top 2/3 of the cake was spongy and delicious, not too eggy at all. My favorite part aside from the top part of the cake that was actually edible was the mirror. The mirror was the best strawberry gelatin I've ever had. Overall the cake tasted alright but I think I could have done a better job.

I was dissatisfied with the end result of this cake, not because of the recipe, but because of my mistakes and inexperience. I will definitely try my hand at the cake again. I'll remake the sponge cake for a Boston Cream Pie. Next time I remake the Bavarian cream I'll use a little less gelatin.

The Recipe:
Visit Peabody's blog for the complete recipe, courtesy of "Cakes and Pastries At The Academy by the California Culinary Academy". Be sure to check out all the beautiful mirror cakes by visiting the Daring Bakers Blog Roll.

Sunday, July 29, 2007

Farfalle with Smoked Salmon, Cream Cheese, and Artichoke Hearts

Smoked Salmon Pasta

Smoked salmon and cream cheese is always a delicious combination. I knew it would be great on pasta but Steven needed a little convincing. He was a bit skeptical about putting cream cheese with pasta. Turns out, smoked salmon and cream cheese isn't just for bagels, it's great on farfalle too!

Farfalle with Smoked Salmon, Cream Cheese, and Artichoke Hearts
Inspiration from Everyday Food

8 oz. farfalle
3 oz. smoked salmon, roughly chopped
About 2 oz. cream cheese (3 - 4 Tbsp) cream cheese, roughly cubed
4 artichoke hearts, chopped into bite size pieces
Handful of bite size broccoli pieces (optional)
1 Tbsp lemon juice
2 Tbsp fresh dill (optional - I didn't use this today)
Salt and pepper

Cook your pasta in some boiling salted water until it is al dente.

While the pasta is cooking, cook your broccoli, steam, microwave, or sauteed.

After the pasta is finish cooking, add the cream cheese to the hot pasta. Toss a bit to melt the cream cheese a bit. Then add the smoked salmon, artichoke hearts, broccoli if using, and lemon juice and toss to incorporate all the ingredients. Gently break up any large pieces of salmon.

Season to taste with salt and pepper.

Serves 2 - 3

Smoked Salmon Pasta

This will be my entry for Ruth's Presto Pasta Night. Never such a thing as too much pasta!

Short post today, but stay tuned for a longer post tomorrow of a "Daring" nature.

Sunday, July 22, 2007

A Tart for Julia - Mango Lime Curd Tart

Mango Lime Curd Tart

My friend Julia came over for dinner Friday night because she is leaving for the University of California, Irvine where she will be a slave to science a part of the M.D./Ph.D. program. Here's to you Julia! Good luck down in Cali and keep an eye out for the bunnies that roam campus. :)

Mango Lime Curd Tart

Lime Curd
1/3 C lime juice, roughly juice from 2 small limes
1 to 2 tsp lime zest, zest from 1 - 2 limes
Save some zest on the limes to garnish the tart
1/2 C sugar
3 eggs
3 Tbsp butter

*Half a mango cut into 1/8 in crescent slices
1 prebaked tart shell
Additional lime zest for garnish

Start preparing the tart crust first (click here for tart crust recipe. The dough will need to chill for at least an hour, then rolled out, chilled again for at least 30 minutes, baked for at least 35 minutes, and then cooled to room temp.

Whisk the eggs, sugar, and zest together. Whisk in the lime juice and butter and cook the mixture of medium heat. Continue whisking until the butter is completely melted then use a spatula and stir the curd constantly. Cook the curd until the mixture has thickened. The spatula should leave a clear trail that slowly disappears. Do not overcook the curd otherwise it will curdle.

Immediately pour the curd through a sieve into a bowl. Use the spatula to push all the curd through. The zest will most likely remain in the sieve and you can discard that since it will no longer be a vibrant green. Press a sheet of plastic wrap against the surface of the curd to prevent a skin from forming on top. Chill in the fridge for a few hours to thicken slightly. The curd can be made a day in advance.

To make the tart, spoon the curd into the prebaked tart shell that has been cooled to room temp. You may not use all of the curd, I used about half (the rest you can spread on toast, yum yum). Arrange the mango slices on top of the curd and garnish with some additional lemon zest.

Mango Lime Curd Tart

*In retrospect: For even more mango in the tart (using a whole mango rather than half), arrange mango slices from half the mango in the tart shell before adding the curd. Then fill the tart with the curd and arrange the remaining half of the mango on top.

Mangoes are one of my favorite tropical fruits so this will be my entry for the 33rd edition of Sugar High Friday: Tropical Paradise hosted by Mary of Alpineberry.

Flaky Pate Sucree

Pate sucree is one of the three basic French pastry crusts (pate brisee - the all purpose crust used for pies, savory and sweet tarts, pate sucree - a sweet crust used for tarts, and pate sablee - the sandy crumbly crust). It is sweeter than the all purpose pie crust, the pate brisee, however the texture can vary. Some recipes call for creaming the butter and sugar then adding the flour, resulting in a crumbly, shortbread cookie-like crust. Whereas other recipes diverge and call for processing or cutting the butter into the flour sugar mixture, which is the same method used to create a pate brisee. This recipe uses the latter technique and yields a sweet, flaky, melt-in-your-mouth crust that is unbelievably good. I'll try the creaming the butter and flour for the next tart but I have a feeling I will be coming back to this recipe again and again.

Prebaked Flaky Pate Sucree
for an 8 or 9 inch pan

1 C flour
1/3 C confectioner's sugar
1/4 tsp salt
6 Tbsp cold butter, cut into 6 pieces
1 egg yolk
2 Tbsp cold milk or ice water
1/2 tsp of vanilla

Add the flour, confectioner's sugar, and salt together in a food processor and pulse once or twice to combined. Add the pieces of butter and pulse until the butter pieces are no bigger than a pea. Alternatively use a fork or pastry cutter to cut in the butter, or freeze the butter and coarsely grate it then use your fingers and rub the pieces into the flour. It is very important to keep the butter cold otherwise it will melt and make the crust greasy and you'll lose all the flaky layers.

Mix the egg yolk, milk, and vanilla together. Drizzle the mixture over the butter and flour mix in the food processor. Pulse again until the dough start to form large clumps. If it looks too dry add a little more milk.

Scrape the dough onto a large piece of plastic wrap and press the clumps together to form a disc. Wrap the dough in the plastic wrap and chill at least an hour up to overnight. Or store it in the freezer for as long as you want.

Preheat the oven to 375 degrees F.

Lightly flour a work surface and rolling pin and roll out the dough to into a large circle. Move the crust around often to make sure it doesn't stick to your work surface.

Transfer the dough to an 8 or 9 inch tart pan. To make this easier, drape the dough over the rolling pin and lay it over the pan. Lift the edges of the crust and gently press the dough down into the pan. Roll over the top of the pan with a rolling pin to trim any overhanging dough.

Prick the surface of the dough with a fork. Press a sheet of aluminum foil onto a crust and add pie weights, beans, or clean pennies on top. I like using pennies because they are the best heat conductor. Bake on the middle rack for 25 minutes. Remove the foil and baking weights (be careful the weights will be very hot!) and return the crust to the oven to bake for another 10 or so minutes until it is golden. Cool to room temperature before filling.

Wednesday, July 18, 2007

Spaghetti alla Carbonara with Basil and Mushrooms

Spaghetti Carbonara with Basil and Mushrooms

The once tiny basil plant on the back porch is now very large and bushy so I'm always looking for ways to incorporate basil into recipes so I can keep up with the plant. This variation of Spaghetti alla Carbonara incorporates basil and sauteed mushrooms with the classic recipe. Carbonara is Steven's favorite meal and in the end he preferred the original version of just bacon, eggs, and cheese instead of this one. However, I found the flavors very enjoyable and a little change is nice sometimes.

Spaghetti alla Carbonara with Basil and Mushrooms

4 oz thick sliced bacon, chopped
4 oz. crimini mushrooms, sliced
2 eggs
1/2 C grated Parmesan
Freshly ground black pepper, generous amount but to taste
8 oz spaghetti
A handful of basil leaves, torn into small pieces or chiffonade

Heat a skillet over medium heat to render the bacon. Once the bacon is crisp, remove with a slotted spoon and set aside in a bowl. Bring a pot of water to a boil.

Pour out all of the rendered fat of the skillet reserving about 1 - 2 tsp of sauteing the mushrooms. Saute the mushrooms until they are brown and all the liquid has evaporated. Add the mushrooms to the bacon and set aside. As the mushrooms are cooking, start boiling your pasta.

As the spaghetti cooks, beat the eggs, parmesan, and pepper together in a bowl. The sauce must be prepared before the pasta is done cooking.

When the pasta is al dente, quickly drain but reserve some of the pasta water to loosen the sauce if needed. Immediately return the pasta to the pot (off heat) and pour the egg mixture over the pasta, add the bacon and mushrooms, and quickly stir into the pasta. The residual heat from the pasta and pot will cook the eggs and thicken it into a sauce. Keep stirring until the sauce has thickened and evenly coats the pasta. Work quickly otherwise the eggs will scramble rather than temper into a smooth and creamy sauce. If the sauce is too thick add a bit of the pasta water to loosen it. Serve immediately and add more freshly ground pepper if you'd like. I like mine really peppery.

Serves 2.

I'm going to submit this recipe for Ruth's Presto Pasta Night.

Friday, July 13, 2007

Two Birthdays, A Whole Lot of Food, Roses, and Animals

Rose
This year for Steven's and my birthdays, we played hooky took some time off work to have a picnic and go to the zoo. Temperatures the day before ranged from 95 to 100, which were 20 to 25 degrees above normal! I know I already complained, but I have to complain some more since it was just too hot for Seattleites. Luckily the temperatures cooled significantly overnight so the weather was perfectly mild and pleasant for our picnic. We set up our picnic in Woodland Park Rose Garden, which is conveniently located right next to the zoo. We dined while surrounded by the wonderful fragrance and sight of roses in full bloom as far as the eye can see.


I packed:
Ham and Butter Sandwich
Salami, Pastrami, Spinach and Cream Cheese Sandwich
Bread and butter
Seattle rolls: smoked salmon and cream cheese sushi rolls
Cold noodles: a must since noodles are a Chinese birthday tradition! long noodles = longevity
Cheese and meat platter: white Stilton, danish blue, cheddar, Parmesan, salami, prosciutto, pastrami, ham
Crackers, grapes, and raspberries
White wine and mango lemonade

Ham and Butter Sandwich

I first tasted a ham and butter sandwich at Le Fournil, a wonderful French bakery in the Seattle area. It was so simple and delicious. It's really important to use good butter, bread, and ham since the flavors of the sandwich are really subtle and clean, the ingredients will really shine. I used some Kerrygold Irish butter; this is the butter I couldn't get enough of at the cheese festival. After reading comments on Jaden's post about bread and butter, some other recommended brands are Lurpak, a Danish butter, and Presidente, a French butter. Just don't use any old regular brand, splurge for the expensive stuff! It's sooo worth it to indulge! And don't you dare use "I can't believe it's not butter" because I can believe it, and it's not butter. ;) After some Googling, ham and butter doesn't seem like a popular combination but it always struck me as a classic French sandwich. Maybe fellow French food bloggers/readers can offer some more info?

Ham and Butter Sandwich*
A section of crusty baguette cut in half
2 - 3 oz. of ham, about 3 - 4 slices
1 Tbsp high quality butter
1 - 2 tsp Dijon mustard

Spread a thin layer of Dijon on one slice of bread, and spread butter on the other slice. Layer with ham and close the sandwich. Cut in half and serve somewhat chilled.

The butter will be hard to spread if it is chilled so wait for it to warm up a little to soften so it's easier to spread. Then chill the sandwich to chill the butter.


Salami, Pastrami, Spinach, and Cream Cheese Sandwich

The idea of salami and cream cheese in a sandwich came from Everyday Food. I had never thought of pairing cream cheese with anything other than preserves or smoked salmon, but this sandwich was truly delicious. The salami and pastrami are very flavorful meats, the cream cheese added a luscious, creamy smoothness, and the spinach is a rich green that holds its own in this robust sandwich. Don't skimp on the cream cheese and no buying reduced fat! You can't go wrong with Philadelphia, my favorite brand.

This sandwich, featuring the very healthy spinach, will be my entry for this week's Weekend Herb Blogging, a fantastic event created by Kalyn of Kalyn's Kitchen, and hosted this week by Susan of Food Blogga. Food fact: After cooking the volume of spinach will decrease by 3/4. Spinach is loaded with vitamins, minerals, antioxidants, bone building nutrients, and other healthy compounds. Eating your spinach will help prevent cancers, osteoporosis, heart disease, arthritis, delay loss of mental function, prevents and even reverse macular degeneration, the most common cause of blindness in the elderly.

Salami, Pastrami, and Spinach Cream Cheese Sandwich*
2 slices of bread or a section of crusty baguette cut in half
3 - 4 slices of salami
2 - 3 slices of pastrami
A handful of baby spinach leaves
2 Tbsp softened cream cheese
Optional: 1 - 2 tsp Dijon mustard

Spread a thin layer of dijon on one slice of bread (optional). Top first slice of bread with a layer of salami, followed by pastrami, and then a thick layer of baby spinach leaves.

Spread the cream cheese on the second slice of bread and close the sandwich. Cut in half and enjoy!

*The quantities are really estimations, since I made the sandwiches without measuring the ingredients exactly. If you like more meat feel free to pile it on or if you really like cream cheese or butter, like me go, ahead and add more! :)


For more pictures:
Rose Garden
Zoo

Regrettably many of the zoo pictures turned out too blurry and I'm not a big picture taker at the zoo to begin with. The red panda was awfully cute though! The butterfly house was very nice also.

BBQ Chicken Quesadilla

BBQ Chicken Quesadilla
The last few days have been unbearably hot, with yesterday being one of the top 10 hottest days ever recorded here in Seattle. I was too lethargic to do get up and do anything other than lay on the couch and complain about the heat. Pardon the silence on this blog, as I haven't been cooking much or blogging. But like Jaden, there are so many old recipes I still haven't gotten around to posting, so now is a good time to do so.

BBQ Chicken Quesadilla was a very popular menu item at my favorite lunch spot near the UW, Honeybee's Cafe (which sadly closed two years ago). It's been a long time since I've had a Honeybee's quesadilla, but from what I can remember, the original quesadilla had grilled chicken, tomatoes, Monterey Jack cheese, tomatoes, green onions, and BBQ sauce in a tomato flour tortilla. This quesadilla is very flexible the only constants are: tortilla, chicken, your favorite BBQ sauce (Cook's Illustrated likes Bull's Eye Original), and cheese. The rest of the ingredients depend on what you have on hand. So here rather than offering an exact recipe, it's just a few tips on making a yummy quesadilla, which I learned from watching America's Test Kitchen.

Barbeque Chicken Quesadilla

Flour Tortillas
Chicken, cut up into large chunks (You can use grilled chicken, leftover roast chicken or bbq chicken, doesn't really matter)
Coarsley grated cheese (Cheddar, Monterey, Pepper Jack, or a combo)
Thinly sliced green onions or red onions
Fresh tomatoes or fresh tomato salsa, drained (if using this then omit the onions)
Corn (frozen is almost as good as fresh)
BBQ Sauce
Freshly ground black pepper
Few dashes of Tabasco if you like it hot
Lime juice, just a little bit (omit if using fresh tomato salsa)

- Toast your corn
Toasting the corn brings out a nice roasted, toasty flavor and evaporates the moisture so it doesn't leak into the quesadilla. This is an essential ingredient in all of my quesadilas now. (Frozen corn also doubles as a handy ice pack if you ever jam your finger in a door like Steven. :( Ouch!)

Heat a small nonstick skillet pan over high or medium high heat (no oil!) and add your corn. Shake the pan occasionally until you see the corn turn a dark brown in spots and pop out of your pan. Yes it will literally jump out of the skillet. Set aside for the filling.

- Make your quesadillas
There's a lot of flexibility here with what goes in so you can be the judge of that. Just don't make them too stuffed otherwise it'll be too hard to flip.

Also, rather than making the quesadilla with one tortilla on the bottom and one on the top and forming a sandwich (this is too hard to flip, stuff will fall out). Add your filling to only half the tortilla (leave a 1/2 in border around the edge) then you flip the other half over and make a half moon shape. This way, less yummy filling falls out. You can also cook two of these in a pan.

- Cooking the quesadilla
If you add the oil directly to the pan it won't evenly distribute to cover the entire quesadilla and sometimes you end up using too much oil leading to overly greasy quesadillas and oily fingers.

So instead, use a pastry brush and brush the tortilla a thin layer of vegetable oil. This ensures that the quesadilla will be evenly covered using the least amount of oil as possible. Optional step: sprinkle a little bit of salt over the oil so it will be even more crisp (I always forget to do this).

Cook the quesadilla over medium heat, oil side down, until the bottoms are crisp and golden brown, it'll will take a few minutes. Then brush the top of the quesadilla with some more oil and carefully flip them over. The second side will take less time because the pan will be hotter.

Slide them out and let it sit for 2 - 3 minutes for the cheese to set. Then cut into wedges and serve.

Links:
I'm not the only Seattleite who can't stand the heat, Pea made an absolutely drool-worthy ice cream.

Monday, July 9, 2007

Cherry Clafouti

Cherry Clafouti

Remember when I said the best thing about living in the Pacific Northwest was the salmon? Well it's a tie between the salmon and the cherries. Washington state is the top cherry grower, producing about 50% of the nation's supply. Oh how I love the cherries; I look forward to them every summer. A few years ago my dad and I bought a bag of the biggest Bing cherries I'd ever seen, they were the size of ping pong balls I want to say (okay maybe a tiny bit smaller than ping pong balls but they were big!), and were soooo sweet. Every summer since then we would talk about those cherries and how we regret only buying one bag. "Hey remember those cherries we got a few years ago?" "Yeah... *wistful sigh*" I have yet to find cherries that big again. Anyways, now that we're in the middle of cherry season, which thankfully is very long (from early June to mid August), Bettina and I pretty much eat, sleep, and breathe cherries. Seriously we sometimes go through about a pound a day, each! The ones that escaped our cherry pillage ended up in clafoutis. Though in the end, I prefer my cherries uncooked but this was a classic French dessert that I wanted to try.

The clafouti is a custard-like dessert that originated in the province of Limousin in central France. Traditionally it's baked with whole, unpitted cherries because the heat releases more complex fruity and almondy notes from the pit. This is Julia Child's recipe (I mean how can you go wrong with a recipe from Julia Child?) with some minor changes. I added some almond extract to enhance the natural almondiness. The main flavor component of cherries comes from benzaldehyde, which is the same chemical as imitation almond extract (okay no more chemistry I promise). The cherries were also very sweet so I cut the sugar amount in half. You can serve clafoutis as dessert or eat them the next morning as breakfast, like Helen's grandfather.


Cherry Clafouti
Adapted from Julia Child
serves 6-8

1 1/4 cups milk, whole milk preferably
1/3 cup sugar
3 eggs
1 tsp vanilla
1/2 tsp almond extract
1/8 teaspoon salt
1/2 cup flour
2 - 3 C cherries (unpitted)
Powdered sugar

Preheat the oven to 350ºF.

Beat the eggs, sugar, salt, and extracts, then add the milk, and finally whisk in the flour. Add some cherries to individual ramekins*, don't crowd them too much, leave a little room for the batter. Depending on the size and height of your ramekins it can make about 5 - 8 servings.

Pour the batter over the cherries, bake the clafoutis until it looks golden brown, somewhat puffy, and the center is set, about 20 - 30 minutes.

Serve warm with powdered sugar dusted on top.

*The ramekins I used ended up being a bit too small, I baked 2 in these oval fluted creme brulee ramekins and 4 in round ramekins with taller sides.

Links:
Helen's Mirabelle Clafoutis
Bea's Chocolate and Cherry Clafoutis (a twist on the Black Forest cake)
Dorie Greenspan's Cherry Clafoutis adapted by Anita

Saturday, July 7, 2007

Sun-dried Tomato and Olive Pesto Pasta Salad

Pasta Salad
(10pm)
"Oh, can you make me something to bring to a potluck?"
"Sure! When is it?"
"Tomorrow"
"..."

Luckily pasta salad is one of my go-to dishes in these situations (ahem Steven, give me a little more warning next time mmkay?). It's quick to make and I can toss in whatever I have in my fridge and pantry. Bettina, Steven's sister, loves pasta salad and was my official guinea pig taste tester for this one and she said it was very good (whew!). I made this a few weeks ago and I swore I wrote down the recipe. A lot of times I just guesstimate quantities but I even made sure I measured everything this time and whatdoya know now I can't find it. So here are the quantities off the top of my head but if anything looks out of the ordinary go ahead and adjust it.

Sun-dried Tomato and Olive Pesto Pasta Salad

1 lb of pasta like farfalle or rotini
1/4 C lightly packed sundried tomatoes, rinsed of excess oil
1/2 C kalamata olives
1/2 C coarsely grated parmesan
1/4 C slivered almonds, toasted
a few sprigs of parsley
1/4 C olive oil
2 - 3 cloves of garlic, minced or pressed
1 Tbsp balsamic vinegar
1 - 2 tsp lemon zest, from half or whole lemon
additional lemon juice to taste
salt and pepper to taste

Boil the pasta in salted water until al dente. Set aside to cool.

Toast the almond slivers in a skillet over medium to medium high heat. Shake the pan frequently until the nuts are golden brown and set aside to cool.

In a food processor, pulse everything except for the lemon juice until it is a fine to coarse chop. When the pasta has cooled a bit, mix in the pesto. Add salt, pepper, and lemon juice to taste.

Serve cold or at room temp.

Kung Pao Shrimp

Kung Pao Shrimp

Kung pao chicken, gong bao ji ding is virtually on every Sichuan Chinese restaurant's menu. The difference between the classic Sichuan version and the Americanized version is in the use of Sichuan peppercorns. The Sichuan peppercorn imparts an unusual numbing and spicy sensation on the tongue, known as ma la, and is used extensively in many of the region's dishes; but these peppercorns are not used in the Americanized dish. One theory is that since the peppercorns were banned from the US from 1968 up until 2005, cooks had to create this dish without the peppercorns. However, the ban was only loosely enforced until 2002 (when they really started to crack down); before then, you could find the peppercorns if you knew where to look. So perhaps another reason is that the ma la sensation was excluded so the dish could cater more to Western tastes. Now thanks to new heat treatments to kill the citrus canker, the peppercorns can now be legally purchased. So no more smuggling them from Canada or under-the-table dealings with your local Chinese restaurant. ;)

Fuchsia Dunlop's recipe was really excellent. It was so refreshing to see that the food wasn't swimming in a pool of cloyingly sweet and goopy sauce. The flavor was great and there was just enough sauce to cling to the food. I used shrimp rather than the chicken used in the traditional dish. The only problem I encountered was with the peppercorns. I wasn't sure if I should remove the peppercorns after frying them in the hot oil. Chomping down on a peppercorn while eating the dish was very unpleasant. I would suggest either use 1 tsp and fry them in hot oil to first perfume the oil, them remove them before cooking the rest of your dish or if you'd rather not deal with the hassle of removing them from the hot oil, use 1/2 tsp and crush them up into smaller more manageable size pieces. this way it doesn't completely overwhelm your palate when you bite down on a piece.

Notes:
- The recipe can also be made with cubes of chicken or pork
- The original recipe does not call for any vegetables but I figured it couldn't hurt since veggies are good for you! If you are adding a significant amount of vegetables you may need to double the sauce.

Kung Pao Shrimp
Adapted from Fuchsia Dunlop's Land of Plenty

1 lb of large shrimp, peeled and deveined
3 garlic cloves and equivalent amount of ginger
5 scallions, white part only
2 Tbsp vegetable oil
About 10 dried red chilies
1 tsp or 1/2 tsp whole Sichuan peppercorns (see note)
2/3 C roasted peanuts or cashews

Optional:
A few ribs of celery, chopped
Half a red bell pepper, chopped
Broccoli stems, chopped or slivered

Marinade
1/4 tsp salt
2 tsp soy sauce
2 tsp Shao Xing rice wine
1 tsp corn starch

Sauce
2 tsp sugar
1 tsp cornstarch
1 tsp dark soy sauce
1 tsp light soy sauce
3 tsp Chinese black vinegar
1 tsp sesame oil
1 Tbsp chicken stock or water

1. Mix the ingredients for the marinade together, toss with shrimp, and let sit in the fridge while you prepare the rest of the recipe.

2. Peel and thinly slice or mince the garlic, mince the ginger, and chop the scallions. Cut the chilies in half and discard as many seeds as possible.

3. Mix all the ingredients for the sauce in a small bowl and set aside.

4. Add 2 tablespoons of oil to a wok or skillet. When the oil is hot add the chilies and peppercorns and fry for a few seconds until they are fragrant (take care not to burn the peppercorns, lower the heat if you need to, shorten the frying time if you're using crushed peppercorns). Add the shrimp (and any vegetable if using) and fry for about 30 seconds then add the green onions, garlic, and ginger. When the shrimp is almost fully cooked, add the sauce (stir it a little to recombine) and cook until the sauce is thick and shiny and the shrimp is cooked through.

5. You can mix the peanuts/cashews in or scatter them on top.

Links:
Another great idea from Jaden: make your own Sichuan peppercorn salt. You can probably use this and sprinkle it on the dish.

Wednesday, July 4, 2007

Green Tea Ice Cream

Green Tea Ice Cream

Ever since I bought my ice cream maker back in February, I have a mile long list of ice cream flavors I want to make this summer. Now that I finally got a copy of "The Perfect Scoop" that list has tripled, maybe quadrupled. I'm jumping on the bandwagon a little late here but man that book is a-ma-zing! When Meeta announced the theme for this months Monthly Mingle, I had a hard time deciding which ice cream flavor to make. I finally settled on green tea ice cream (and whatdoya know David has a recipe for it!) with the intention of wrapping them in mochi, ala Mikawaya. Unfortunately, the mochi making turned out to be a disaster. It stuck everywhere and to everything. I could not get it off my hands let alone wrap it around ice cream. They weren't kidding when they said that stuff is sticky. (I read that not even the Heimlich can dislodge it!) Thankfully the ice cream was delicious so I didn't dwell long on the failed mochi.


Green Tea Ice Cream

Notes:
- I changed the milk/cream ratio because I didn't have enough cream and I felt almost guilty using as much as the recipe suggested, though I'm sure it would have made the ice cream even more delicious! I stuck with the recommended number of egg yolks, though I only had extra large eggs so the end result was a tad eggy, but again it was really delicious so no complaints.
- I also divided the recipe in half
- And since my matcha was ancient, I had to increase the amount from the recipe's 2 tsp and regrettably I didn't achieve the brilliant green of the photographed ice cream in the book.

Green Tea Ice Cream
Adapted from David Lebovitz "The Perfect Scoop"

3/4 C milk
3/4 C heavy cream
3 egg yolks
6 Tbsp sugar
2 tsp matcha powder
1/8 tsp salt

Heat the milk and salt in a saucepan over medium heat until it is hot but not boiling. Meanwhile, whisk the egg yolks with the sugar until it's pale yellow and ribbony.

Anchor your mixing bowl by placing a damp kitchen towel around the base of the bowl. Slowly drizzle in the hot milk into the egg yolks while whisking continuously.

Return the custard mixture into the saucepan and heat over medium heat. Stir continuously with a heatproof spatula while making sure to scrape the bottom. Cook until the mixture is thick enough to coat the spatula and a line drawn across the back of the mixture on the spatula stays clear. If the line blurs then continue to cook it a little longer. Don't boil the custard.

Add the matcha powder to the heavy cream then slowly whisk into the custard. Whisk the mixture until all the matcha powder has dissolved.

Chill in the fridge for a few hours. Then freeze in an ice cream maker according to the instructions.


Sunday, July 1, 2007

Mile High Buttermilk Biscuits and Sausage Gravy

Mile High Buttermilk Biscuits

I first made these biscuits for Thanksgiving last year and hands down they are the best biscuits ever. Gone are the days of buying tubes of preservative-laden, artificially flavored biscuit dough, though I must say I miss the entertaining “pop” of opening those cylinders. These crispy on the outside, soft and fluffy on the inside biscuits are absolutely delicious on their own or smothered in sausage gravy.

Mile High Buttermilk Biscuits
From Cook’s Illustrated

2 C flour
1 Tbsp baking powder
1 Tbsp sugar
1 tsp salt
1/2 tsp baking soda
4 Tbsp unsalted butter
1 1/2 C buttermilk
Additional flour
2 Tbsp melted butter

Preheat oven to 500ºF. Spray a 9 in springform or cake pan with some nonstick spray.

Add flour, baking powder, baking soda, sugar and salt to a bowl and mix the ingredients together evenly. Using a fork or pastry blender, cut in the butter until the pieces are no bigger than a small pea. Fold in the buttermilk until everything is just blended, and there are no streaks of flour remain. Do not overmix, the mixture should still be lumpy.

Line a plate or tray with some flour and using a 1/4 C measuring cup or 1/4 C ice cream/cookie scoop, scoop out balls of the dough onto the tray of flour. Flour your hands and roll each ball around in the flour to evenly coat them in a layer of flour. The dough is very wet and very sticky. Place the dough balls into the prepared pan. Place 9 balls around in a ring and 3 balls in the center of the pan. Brush the tops of the biscuits with melted butter.

Bake for 5 minutes at 500ºF (middle rack) and then lower the temperature to 450ºF and bake for another 15 minutes.

In the past I've always baked these in a cake pan or springform. Alternatively you can also bake them individually in a muffin pan which is what I did this time because I’m waiting for my newly ordered cake pans and springform to arrive. I baked these on the upper middle shelf and at 450ºF for the entire time of about 17 minutes.

LinkWithin

Blog Widget by LinkWithin