Wednesday, January 21, 2009

Unagi Sushi Rice Bowl

from the archives
Unagi Sushi Rice Bowl
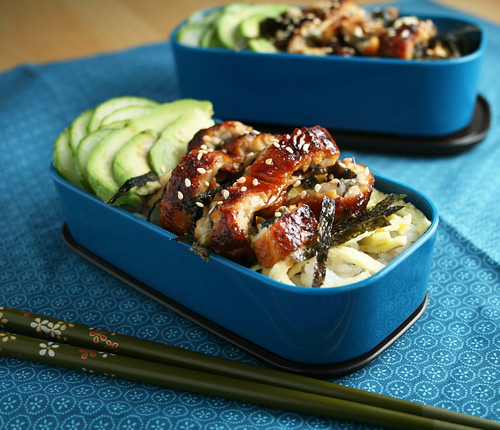
I bought some adorable bento boxes over Christmas break.

When Steven and I go out to sushi, we always have to get something with unagi. Steven usually goes for the unagi rice bowl, unagi fillet over a bed of steamy rice served in a handsome, black lacquered box – simple, refined, and elegant. Whereas I love the truly ostentatious, completely over-the-top rolls with unagi, avocado, deep fried soft shell crab, you name it, preferably with some sort of vegetable antenna sticking out.

As a compromise, with these sushi bowls aka lazy sushi, Steven gets his unagi on rice and I get to add a bunch of extras to jazz things up. It has to have avocado because I heart avocado and the textural contrast between the creamy avocado, soft unagi, and crunchy cucumber, and crisp nori is amazing. It’s perfect for when we get a sushi craving but I’m too lazy to stand there rolling sushi, especially when my rolling skills leave much to be desired.

Unagi Sushi Rice Bowl
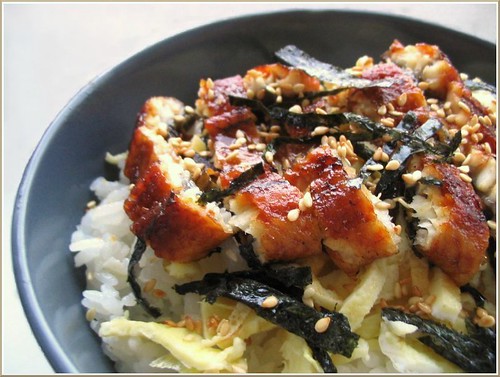
Wow look at this ooolllddddd picture from June 07. Hopefully my photography has improved since then.

If you live close to an Asian grocery store, like 99 Ranch, you can find unagi precooked and vacuumed sealed in the frozen section. You can microwave, bake, or boil the unagi directly in the bag to heat it up. A 7 oz. fillet will usually make around 3 servings. If you don't have eel, you can use crab or shrimp.

Unagi
Unagi Sushi Rice Bowl
7 oz. unagi fillet cooked according to package instructions
1 large egg, beaten
Cucumber slices
Avocado slices
Nori, cut into thin slivers (I used kitchen shears)
2 tsp toasted white sesame seeds
Kabayaki Sauce (recipe follows)
Sushi Rice (recipe follows)

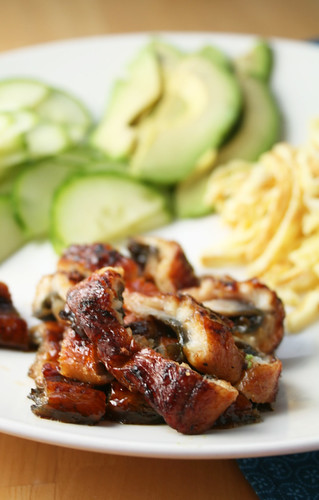
Usually unagi is fully cooked so you just need to warm it up in the oven. Prepare it to package instructions, mine said to bake it in a 400ºF oven for about 10 minutes.

Beat the egg with a pinch of salt. Heat about a teaspoon of oil in a large nonstick skillet over medium heat. Pour in the beaten egg and swirl the pan to cover the pan evenly with a thin sheet of egg. When the egg looks almost set, shake the thin egg sheet onto a large plate then flip the egg into the skillet again to cook the second side. The entire process will take about 2 minutes because the egg will cook really quickly. Julienne the egg into thin strips.

Add a portion of sushi rice in a bowl then top with egg strips, cucumber slices, avocado slices, nori slivers, and unagi. Drizzle with kabayaki sauce to taste and sprinkle with sesame seeds.


Unagi Kabayaki Sauce
1/4 C soy sauce
1/4 C mirin
1 Tbsp white sugar

Add the mixture to a small saucepan and simmer gently until slightly thickened, be careful to not burn the soy sauce.

Sushi Rice
2 C short grain or sushi rice
2 C water
1/4 C rice vinegar
2 Tbsp sugar
1/2 tsp salt

I usually cook rice in the rice cooker so I honestly have no idea how to cook it on the stovetop.

Dissolve the vinegar, sugar, and salt either in a saucepan over low heat or microwave for 30 seconds until the solution is warm and whisk to dissolve.

When the rice is finished cooking, pour the vinegar mixture over the rice and use a rice paddle or spatula to gently fold the rice. Don’t smash the rice. Let the rice cool until it is body temperature.


Monday, January 5, 2009

Five Spice Pork Belly with Steamed Buns

Five Spice Pork Belly
Pork belly has been one of my favorites ever since I was a little girl, way before everyone jumped on the pork belly bandwagon. I can’t imagine a more perfect piece of meat - 2 to 3 inches thick, 50% meat, 50% fat, and rind on top. Effing amazing. Not something I dare to eat everyday but once in a while I treat myself when I go to the Asian supermarket to stock up on groceries.

Last time I tried to roast pork belly, there was a freakish chemical reaction between the wine in the pan and aluminum foil, ruining my pork belly. I never liked chemistry. Who knew the acidity of the wine would dissolve the foil onto the pork? After that tragic incident, I stuck to my usual Shanghai style red braising. But I longed for that crackling crisp rind. This time, I tried slow roasting (with no aluminum foil!), hoping that the gentle heat would slowly render the fat as it essentially confits the meat underneath. The meat was so tender, it was nearly falling apart sitting on the cutting board. Unfortunately, I think I roasted it for too long because the rind became too hard to eat, toothcrackingly hard. Bummer! Next time, I’ll try a different temperature and time.

I thought I was really onto something here serving slices of pork belly like Peking duck with hoisin sauce, cucumber (I skipped the cucumber slices and made a salad with it instead), and sliced green onions, on steamed Chinese buns (toilet seat lid buns because that's what they look like to me. Is that too much info? I'm weird). Apparently, I was not the first person to think of this ingenious dish, one that's very famous in NYC. Well, color me embarrassed...*smacks forehead*

Five Spice Pork Belly

Five Spice Rubbed Pork Belly
serves 6

2 pounds pork belly
1/4 C soy sauce
1/4 C shao hsing rice wine
3 whole star anise
4 green onions, bottom half (the white part)
5 slices of ginger
1/2 tsp five spice
1/2 tsp salt
2 tsp packed brown sugar

Score the pork belly rind in a diamond pattern.

Cut the green onions in half lengthwise. Smash the ginger with the flat side of your knife. Add the soy sauce, star anise, green onions, and ginger to saucepan and bring to a boil. Take off heat, cover, and let the flavors infuse while the mixture cools. When the soy sauce mixture is cool, add the rice wine. Pour this mixture over the pork belly. Keep the marinating pork belly in a Ziploc bag or a large container in the fridge for 4+ hours, up to overnight, flipping the belly over once.

Preheat the oven to 450 degrees F. Mix the five spice, salt, and brown sugar in a bowl.

After marinading, wipe the pork belly dry with a paper towel and rub it with the five spice mixture. Strain the ginger, green onion, and star anise out of the marinade and spread this on the bottom of your roasting dish. Place the pork belly on top and roast at 450 degrees F for 20 minutes.

Turn the heat down to 300 and roast until the skin is crisp, about 1 1/2 hours? (really rough estimate here because I roasted for 2+ and my rind was all hard).

Remove from the oven and set aside to cool for 10 minutes, then slice. Serve over rice, noodles, or with steamed buns with cucumber slices, green onion slivers, and hoisin sauce.

Plain Steamed Buns (a more detailed post about these buns will come later)
3 C all purposed unbleached flour (bleached flour will make whiter buns)
3 tablespoons of sugar
1 1/4 tsp instant yeast
1 tsp baking powder
1/2 C heavy or whipping cream
1/2 C water, more if needed

In a large bowl, whisk the flour, sugar, yeast, and baking powder in a large bowl.

Mix the cream and water and heat until the mixture is warm to the touch (around 110 to 115 degrees F) and add to the flour mixture.

Bring the dough together. Turn onto a clean work surface and knead until the dough is smooth and just a little bit sticky, adding more water if necessary. Do not overknead this dough, you just wanted to bring the ingredients together and make a uniform dough.

Place the dough back in the bowl, cover with plastic wrap and put it somewhere warm to rise until doubled, about 2 hours. I usually put the dough in the oven with a bowl of just boiled water on the bottom rack.

When the dough has risen, gently turn it onto a lightly floured surface. Divide the dough in half and cover one portion. Roll one portion of the dough into a long log. Cut a piece off the log and gently roll it into a long oval. Fold the oval in half (the long way) and set aside. Repeat with the rest of the dough. Cover and set aside to rise again for 1 hour to 1 1/2 hours or until the buns have risen more and feel soft and poofy with gently poked. Steam for 10 minutes.

LinkWithin

Blog Widget by LinkWithin